Saturday, June 30, 2012

Eggplant, Chickpea, and Tomato Casserole

It may seem like it's the wrong season for this dish. But, I assure you, it's not.

This dish tastes so good, it could be served during any season.


It could even be served on Mars!


Layers of eggplant, chickpeas, and tomato, baked until bubbling and juicy.

Mmmmmm. . .

I bet your mouth is already watering.


Eggplant, Chickpea, and Tomato Casserole - original recipe can be found here

You need:
  • 1 pound eggplant (one large eggplant or 2 medium sized ones)
  • Salt, to taste
  • 3 tbsp extra virgin olive oil
  • 1 large onion, sliced along the grain, thinly
  • 2-4 garlic cloves, minced (to taste)
  • 1 (28 ounce) can chopped tomatoes
  • 2 tbsp tomato paste
  • Itsy-bitsy pinch sugar
  • 1/8 tsp cinnamon
  • 1 sprig basil
  • 1 (15 ounce) can chickpeas, drained
What to do:
  1.  Preheat the oven to 450 degrees.  Then, line a baking sheet with aluminum foil, and brush the foil with olive oil. Place the eggplant slices on the foil, sprinkle with salt and brush each slice lightly with oil. Place in the oven for 15 minutes or until lightly browned. Next, remove from heat, and carefully fold the foil in half over the eggplant. Crimp the edges together so that the eggplant is sealed inside the foil and will continue to steam and soften. Leave for at least 15 minutes.
  2. Meanwhile, make the tomato sauce. Heat 2 tablespoons olive oil in a large, heavy skillet over medium heat. Add the onion. Cook, stirring often, until tender, (about five minutes) and add the garlic and a generous pinch of salt. Cook, stirring, until the garlic is fragrant, about a minute. Add the tomatoes, tomato paste, sugar, cinnamon, basil and salt to taste. Bring to a simmer, and simmer uncovered, stirring often, for 20 to 25 minutes, until the sauce is thick and fragrant. Add freshly ground pepper, then taste and adjust salt. Remove the basil sprig, and stir in the drained chickpeas.
  3. Preheat the oven to 350 degrees and oil a gratin dish. Cover the bottom with thin layer of tomato sauce, and make a layer of half the eggplant. Spoon half the remaining sauce over the eggplant, and repeat the layers until no more eggplant or tomato remains.
  4. Bake 30 minutes, until bubbling. Remove from the heat, and allow to cool for at least 10 to 15 minutes before serving.


The only downside to this recipe is that it's not very pretty. In fact, I might even call it ugly.

I'm afraid my pictures don't help much, either. When I made this, I only quickly snapped some photos (It was right before dinner and I was hungry), instead of setting up a shoot. This resulted in some not-so-good pictures of an already ugly dish. Oops. . .

How about I just promise that it tastes way better than it looks?

Will that get you to try it?
Pin It!

Thursday, June 28, 2012

Cheesy Star Chips

Honor our country.

Make these chips for the Fourth of July.


The perfect snack.

Crunchy, cheesy, quick, fun. These chips have it all.


Throw them together for a healthy and easy food to munch on while waiting for fireworks. You can even get the kids to help you out!


Cheesy Star Chips

Flour tortillas
Sliced cheddar cheese (you can try a different type of cheese too)
Chile powder or paprika
2 star cookie cutters (one bigger than the other)

Preheat oven to 350F.  Use the bigger cookie cutter to cut out stars from the flour tortillas.  When I made these chips I used 2 flour tortillas and that made about 15 stars.  Bake stars in preheated oven for 5 minutes.  Meanwhile, take sliced cheese and use the smaller cookie cutter to cut enough small stars to cover all the bigger ones.  When the tortilla stars finish baking, place cheese stars in the center of each one and bake for another 5 minutes, or until the cheese melts.  Sprinkle chips with spice of choice and let cool before eating. Store leftovers in an air tight container (please note that the longer the chips are left out after baking, the chewier and less crunchy they get)


What to do with leftover tortilla/cheese scraps: You can make more cheesy chips by using the same process ( baking time may be less if you're using small pieces) or you can make plain salted tortilla chips (bake only once for about 7 minutes).


Snacks are always a great thing to have on hand, especially on those nights when you'll be staying up late.

These star chips are great to munch on because they're portable, easy to make, and totally something any kid would love.

So, why not add them to your Fouth of July snack table?


Pin It!

Bakeries and Breakfast

I'm officially onto the last leg of my trip.

After a short stop in Sweden and an overnight cruise, I arrived, exhausted, but excited, in Riga, Latvia.

One good nights sleep later, I was off exploring the city with my family, on my way to a bakery where I was planning to pick up breakfast.

Maize (meaning bread in Latvian), was the name.


Entering the store, I was met by the wonderful smell of baking bread and the sight of many delicious pastries.


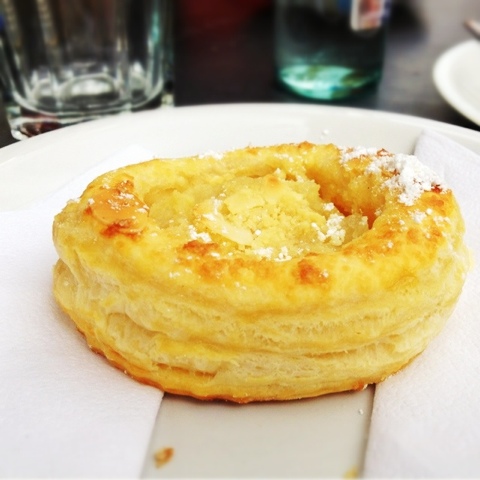
All of us together bought two small apple pies (they were actually more like apple tarts), one rhubarb crumble bar, a roll, and a couple drinks.

Coffee (the "M" stands for Maize)
All the baked goods from the bakery were delicious. The pie had a flaky crust and a somewhat jelly-like filling with just the right amount of sweetness, the crumble was gooey and bursting with flavor, and the roll, well it was just plain good.

Rhubarb Crumble Bar and part of the Roll
Soon, only crumbs remained on the plates and cups were empty.

Apple Pie/Tart
We then headed off again, to wander the streets and stop at one of the many local markets than can be found in Riga.

Oh, how I love exploring new places.

Blueberry Juice (Don't you love the color?)


Pin It!

Wednesday, June 27, 2012

A stop at Vegamot, a cafe

If there's one thing to look forward to while traveling, it's the food.

Of course, there's sightseeing and museums, but really the restaurants are the things everyone wants to see. Right?

Today, on the last day of my trip in Iceland, I stopped at a lovely little cafe with outdoor seating.

Though it was a bit chilly outside, my family and I ordered coffees and enjoyed the crisp outside air.


When the coffee cups came, they were just so pretty that I had to take some photos. Unfortunately, someone (I won't name any names) had already taken a sip out of theirs.


Anyways, soon the coffee cups were emptied and everyone agreed that they were far hungrier than they had originally thought.


It was a good thing the cafe also served lunch!

After placing our order (we got a hamburger, a panini, and 2 omelets), a little wooden block with a number was placed on our table and we began to wait

(At most of the restaurants we've visited in Iceland, numbers are used to mark tables and when you've finished your meal, you go to the front desk and pay by telling someone that number)


When the food arrived everyone was so hungry that they nearly dove into their plates, giving me no time to take any pictures. I did, however, get some pictures of the plates after the meal.

I think it's fair to say that we enjoyed the food!


Pin It!

Monday, June 25, 2012

Zucchini Chips

Who doesn't love chips?

Potato Chips, tortilla chips, pita chips.

And, of course, zucchini chips.


Zucchini Chips?

Why yes, little round zucchini pieces that have been baked to a crisp.

The best part? They actually taste like potato chips, even though they're much healthier.


Zucchini Chips


You need. . .

  • Zucchini (however much you have lying around)
  • Non-stick cooking spray
  • Salt
  • Optional: seasonings (I like my chips plain, without any seasonings)
Steps. . .

Preheat oven to 220 degrees and spray a baking sheet with cooking spray.  Slice zucchini very thinly and lay out on baking pan (don't overlap). Spray with a bit more cooking spray, sprinkle with salt (not a lot) and add any desired seasonings.  Bake in oven for around 45 minutes, then flip and cook for another 30 minutes, or until the chips are as crisp and browned as you like.  Serve soon after baking.


Munch on 'em, snack on 'em, crunch on 'em.

These babies are a great way to get those much needed veggies into your diet without sacrificing taste.

You can jump up and down with joy now, I won't judge.

Pin It!

Sunday, June 24, 2012

An Icelandic Flea Market

One of the things I love about vacation is trying something new.

For example, attending a flea marker in Iceland, which is what I did this morning.

It was an indoor market located right by the harbor and as soon as I stepped into the building, the smell of fish overwhelmed all my other senses.  Though the first stalls set up were not ones containing food, it was clear that at some point, there would be seafood.

With this fact in mind, I slowly made my way down the rows of shops, briefly stopping to look at a stand covered in various childrens books.


Eventually, I reached the food section, and that was when the real fun began.

It started out with baked goods, but soon transitioned into tons and tons of fish.

There was cod, salmon, dried fish fillets.  Everywhere you looked, a fish was (or fish parts were) staring at you.

Dried Fish

There were even some samples!


Next up was the meat section.

Among the blood sausages, large amounts of beef, and lamb stakes, I discovered something truly disgusting.

Can you guess what these are?


That's right, horse sausauges!  Isn't that awful?

Needless to say, I didn't stick around those things for a while.

Instead I hurried over to a display of speckled eggs.


Apparently, as the man selling the eggs explained to me, they were from an Icelandic seabird called the kittiwake.

Never having heard of thie bird, the eggs interested me, not only because of their spots, but also because of the unique fact that they probably only come from Iceland.

That's another thing I love about vacation; all the unique things you stumble across, that you could never find at home.

Pin It!

Saturday, June 23, 2012

Mini Carrot Cake

Carrot Cake is my new favorite.


To be honest, I didn't even know I liked it until a couple months ago while shopping at Costco.


I had been prowling thought the aisles, looking for something that I remember as being important, when I stumbled upon a cake samples table. Never one to give up free desserts, I quickly selected one of the neatly displayed cups and hurriedly pushed my cart away to find that oh so important item which I have now forgotten.

It wasn't until I actually looked down to eat the cake that I noticed that it was not your average chocolate or vanilla. Instead, it was orange, and therefore, carrot cake. Though a bit disappointed not to have a cake flavor I particularly enjoyed, I still ate the small bit of cake.


It tasted good. So good, in fact, that I had to hunt down a recipe online as soon as I got home so I could make more.


Mini Carrot Cake
(makes one single serving cake)

  • 3 tbsp flour
  • 1 tbsp sugar
  • 1/4 tsp baking powder
  • A pinch salt
  • 1 tsp cinnamon
  • 1/6 tsp ginger
  • A pinch cloves
  • 1 tbsp applesauce (or oil)
  • 3 tbsp milk (I used almond)
  • 1/4 tsp vanilla extract
  • 1/4 cup shredded carrots
Combine dry ingredients in one bowl.  In another bowl mix together wet ingredients. Add the shredded carrots to the wet ingredient bowl.  Then, gradully mix the dry ingredients into the wet ones until combined.  Pour batter into a ramekin or mug (I used a mug) and microwave for 2 minutes.  If cake is still gooey, microwave for 20 seconds longer, or until the cake is fully baked.


This is how I satisfied my newly found carrot cake craving. With a single serving cake I could make in the microwave.

It was just what I was looking for.

As soon as I took a bite, the carrot cake loving monster in my belly was silenced. It's good to know that if that crazy monster ever returns, It will only take a couple minutes to, yet again, put it to sleep.


Pin It!

Thursday, June 21, 2012

Banana Orange Yogurt Pops

As I write this, the weather is above 90 degrees.

Not. Cool.

You can't even step outside without being smacked in the face my an absurdly warm gust of wind. Let me just tell you, it's no fun.

But, here in my badly air conditioned home, I have found some ways to cope.

The main way being popsicles.


I froze a couple a few days ago, with my newly bought mold, and today was the perfect day to try them out.

The Banana Orange Yogurt Pops I had thrown together were difinitely a big success.  Not only did they keep us cool (at least for a few minutes), they also tasted delicious.


Banana Orange Yogurt Pops

1 cup plain yogurt
1 ripe banana, sliced
1 tsp vanilla extract
1 cup orange juice
1 tablespoon sugar - if needed

Blend all ingredients together and then freeze in popsicle molds (or plastic cups). After roughly 1 hour insert popsicle sticks and then freeze again, until solid.


I suppose I'm not even getting hit by the heat the worst. After all, I have my creamy popsicles and the knowledge that soon I'll be on a plane to Iceland, to help me out. Some people have nothing but the super expensive (but rather yummy) ice cream from the town center.

Alright, I'm going to stop writing now, as the air conditioner needs to be turned up.

See ya! And the next time I post, it will be from Iceland!


Pin It!

Wednesday, June 20, 2012

I have an announcement. . .

It probably won't seem all that exciting to you guys, but to me, it's a pretty big deal.

I'm going on vacation!

And for two whole weeks, at that.

So where am I visiting?

A couple of places actually.

The first place is Iceland, a small little nation located way up north.  Since I'll be visiting the day after the summer solstice (tomorrow!), the sun actually won't set until midnight, only to rise again at 2 A.M.  But don't worry, my family and I are traveling well equipped with animal shaped eye covers to block out the sunlight.

 
They're actually pretty funny, right?

I even got Little Miss Chocolate Hater to model out the bunny for me.  Isn't she cute?


Anyway, I'm also visiting Latvia, a place you've probably never heard of.  You can read more about it here, but for now, I'll just say that it's a small European country which, apparently, has some pretty darn good pork (and potatoes).  I'm excited to try it!

But, really, the only reason I'm posting this is to explain why, for the next couple days, the things I'll be posting may be more what I'm eating and not how to make it.

I'm sorry about that, but, still, keep you're eyes open for some Icelandic and Latvian dishes, because I'm sure the'll be coming your way.

(But don't worry, they'll be some old recipes too, that I'll post, one of which I hope to be fourth of July inspired.)


As a side note:  Did you notice the new header?  I made it myself.  Leave a comment and tell me what you think!  I'd love the feedback.
Pin It!

Watermelon Slushies

Today, summer officially begins.


So, I thought it only appropriate to give you guys a truly summer-y recipe.


Something cold.  Something fresh.  Something to relax outside with while enjoying the sunshine.  Something like a Watermelon Slushie.


Now, don't get the wrong idea.  These slushies are not the brightly colored ones you buy at the movies.  They are not packed with sugar and artificial ingredients.  Instead, they're refreshing little glasses of fresh fruit that you most definitely won't feel guilty slurping up.


Watermelon Slushies
  • Roughly 2 cups frozen watermelon
  • 1 cup fresh watermelon
  • 2 fresh mint leaves
  • Juice of 1 lime
  • A spoonful of sugar, if needed
Thaw your frozen watermelon a bit, if desired.  Then, blend everything together in a food processor until it's a slushie-like consistency.  Pour into 2 or 3 glasses and enjoy!

Side Note:  To make sorbet you can freeze the mixture and then blend again once it's frozen


There are few things in this world better than a cool drink in the hot sun.  So, treat yourself to sophisticated watermelon slushie today.  I know you won't regret it.


After all, it is the first day of summer.  What better way to celebrate?


Pin It!

Monday, June 18, 2012

PB's

No, PB does not stand for peanut butter.  Nor Pottery Barn or lead.


PB stands for a brownie with a secret ingredient. . .prunes!


But don't close this page.  Don't give up all hope on these brownies.  They do not taste like some icky trying-to-be-healthy brownie re-make.  They taste like amazing little bites of goodness.  Trust me.


PB's (Prune Brownies) - original recipe can be found here

You need:
1/2 cup unsweetened cocoa powder (use a good quality brand; I use ghirardelli)
A little under 1/2 cup applesauce
3 egg whites
A little under 1 cup sugar (you're welcome to taste test to find the right amount sweetness)
1 tsp sea salt
1 tsp vanilla extract
1 tsp instant coffee granules
1/2 cup whole wheat flour
Around 4 prunes

What to do:
Preheat oven to 350F.  In a large bowl mix together all dry ingredients.  Put applesauce and prunes into small bowl (or mug) and use an immersion blender to blend until smooth (if you don't have an immersion blender you can add some liquid and fork mash really well).  Pour the applesauce and prune mixture into a bowl and add egg whites.  Mix together.  Gently fold the wet ingredients into the dry ones and stir only until moistened.  Pour into sprayed 8x8 pan and bake for 20-25 minutes (for extra fudgy brownies you can under-bake a bit and then let sit overnight).  Let brownies cool before serving.


I'm really into secret ingredient brownies, aren't I?  First the black bean ones and now these.  However, I do have my reasons.

Whenever a make a brownie with a funny ingredient they come out so delicious.  These prune ones are decadent, dense, and oh so fudgy.  The best type of brownie, in my opinion.


So, let this be a lesson to all.  Don't let a strange ingredient scare you away, or you may be sorry!


Pin It!